Here you’ll find a collection of things that I do, make, say and think. A collection of projects I publshare on other sites online. Including; custom built and designed guitar or Hi-Fi amplifiers and effects, custom PC servers, and rescued, upcycled hardware. Simply a central place to collect what I’m doing with some of my a creative rest at any given time.
If you are in search for my professional information go to >JohannesJohansson.com<
For multiple ways to contact me this >linktree< makes it easy.
Categories
- DIY (23)
- DIY Audio (12)
- DIY Computation (7)
- DIY Misc (5)
Random Posts
-

TrainWreck Rockette: 1 Redesigned
The trainwreck rocket is a highly coveted and copied guitar amp, however it, in part, is a copy itself. It is the core of a […]
-

Homelab: 3 Turning laptops into mini-servers
One of the most common e-waste sources out there is laptops, slower than other computers and often not upgradable, lacking ability to change peripherals, like […]
-

Restomod Car: 2 Brakes and Suspension
Completely changing the suspension and brakes with oversized parts on this little car can make for a very fun ride and good companion to a […]
-

Homelab: 4 Family & apartment friendly server cabinet
Finding ways to live with an interest in computers can be a challenge. That is having half a dozen computers running 24/7 is not something […]
-

Splitter pedal: Two guitar amps at once
Splitting the output of your guitar/pedalboard to two separate Guitar Amps is one of the most powerful way in shaping your tone and ‘broaden’ the […]

Easy Naim Hifi poweramp upgrades
Why these mods work is quite simple, even very expensive hifi-gear tend to use cheap sonically bad components where size is an issue. With some looser considerations there, however, really is room to hook up, for instance, capacitors that better preserve high frequencies, or resistors with less variance in a few key spots, easy changes. And as a user you can cut some corners the manufacturer can’t.
Firstly though it should be said that I was able to A/B these mods to a stock NAPV 175 that I also own (that is the 3-channel version of the same amp (NAP 150)). The results? In short, if you got a Naim Poweramp and your fairly safe with a soldering iron. Get these mods done!! Specifically Naim NAP 140/150/150x and even the 3.000/5.000€ Naim NAP 200/250 can be improved in this way. If you have another decent Hifi poweramp it should be similarly easy to at least upgrade input and feedback caps since even the most highly priced amps tend to have lesser components in these vital spots. Output transistor decoupling is a bit more invasive and hard to pull of, its not expensive though so might as well when your at it. However be sure you know what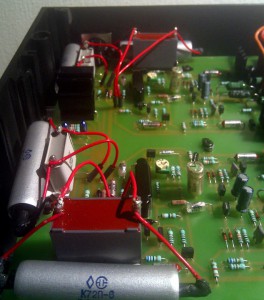 your doing when adding things to the power transistors directly.
Input capacitors should be of a value of around 10uF to allow a full range of the expected frequencies to amplify. Good quality film capacitor is a good base, these are large but should fit. To keep the high end ‘shimmer’ and ‘detail’ you should parallel them with some low value teflon capacitor (around 1/100th the value). This is due to this, what is called, dialectic material having better properties to pass forward the highest frequencies. Problem is, however, teflon capacitors are large and really, very expensive.
A trick is you can grab some soviet-era teflon capacitors on ebay for reasonable prices. Unless you’ve dabbled with old stock parts before this may sound strange but these capacitors where used in everything from fighter jets to missile-silos and computers of the 80’s and 90’s. Teflon film/foil construction in aluminum encased glass enclosure made to survive many, many decades. As it’s the dielectric properties of the materials used we’re after as such age really don’t matter (electrolytic capacitors excluded). As for the feedback capacitors those need to be larger, around 47uF minimum, we can even put film capacitors here without spending to much. lastly in the third most important location of Naim amps the VBE biasing decoupling cap, we can use sealed wet tantalum capacitors. Sprague military issue is a good choice without needing to overspend on Film caps. These are easier mods, and if you want you can exchange the resistors in the direct signal paths to higher quality, tighter tolerance values. Lastly the output transistor decoupling mod, seen in the schematic below, includes running a large solid teflon and silver coated solid new grounding wire to earth with a larger capacitor around 470uF 50V, however you can also increase the main capacitors in the power amp. Lastly if brave you can remove the protective circuitry on Naim power amps for some well known gains, however, at your own risk!
Output transistor decoupling
“The detail of the amp gets a significant bump, as well as depth and dynamics, its a tastier sound, bigger all around. New dimensions to the music with added clarity.” There, that’s about the same kind of buzzwords people try to use to convey sound. Really though, what I can confidently say is that the soundstage widens (experienced as a broad, big sound), a more dynamic low-end (experienced as softer refined low-mids) and there are more detailed highs available (crisper quicker high end) after you apply the mods. Those three points are directly connected to the mods done and empirically derived. A very nice upgrade that opens up the sound.
The mods are general, them and others can be sourced here: http://www.acoustica.org.uk/t/naim/power_amps.html