Random Posts
-

Headphone repair
When headphones wear out it’s not unusual to effect the soft fabric parts only, so can eb saved by replacement, or you can prevent failure […]
-

TrainWreck Rocket: 1. Redesigned
The trainwreck rocket is a highly coveted and copied guitar amp, however it, in part, is a copy itself. It is the core of a […]
-

Turning laptops into mini-servers
One of the most common e-waste sources out there is laptops, slower than other computers and often not upgradable, lacking ability to change peripherals, like […]
-

Easy Naim Hifi poweramp upgrades
Why these mods work is quite simple, even very expensive hifi-gear tend to use cheap sonically bad components where size is an issue. With some […]
-

25 Year old computer as a firewall: 60Mbps throughput!
If you have spend some time around a computer interested individual you may at one time or another have come across the suggestion that a […]

Dumble Overdrive Special
The Dumble amplifiers are clearly the highest priced guitar amplifiers ever to exist, and with good, or at least understandable, reason. These amplifiers fetch more than 50.000$/€ a piece, a staggering sum. Why this is understandable can be gleaned by two or three pieces of information, first, the fact that many of the worlds best guitarists since the 70’s have been or are currently using them rather than other amp’s. Second, imagine that Jim Marshall, of Marshall amps only ever built 300 amplifiers over 50years, (you know marshall as always being part of mainstay rock). How this came to be was since Alexander Dumble, now deceased, only built amps uniquely for artists directly, and doing so by hand himself taking an extended period of time(often a year or more). Lastly, they are a unique ‘breed’ of guitar amplifiers, something exceedingly rare in an area where variations are quite limited to a few main lineages of amp’s.
However, for some time a selection of examples have been traced and the schematics released online, resulting in a large industry of copies, still usually around 3.000$/€, much more if using the same-ish parts as the original amp’s. Adding up the parts, if you can find them, still results in a much much lower total if you have the capability to build it yourself.
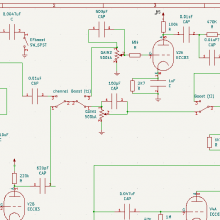
My build will use such hard to find parts as in aggregate they really do matter, as in measurably, quantifiable matter in influencing the sound. I base that statement on both learning from existing technical studies, to actually performing AB tests. I follow a blend of the very popularly copied Dumble ods number 183, but I add such things as a second, hrm, tone stack, a tube buffered effects loop, and several mods and tweaks, some mentioned here, detailed in a second post ( link when available)
To start with it is nice to use period correct parts when possible, these first one are more that than a main influence on the sound. The plate resistors set the exact voltage that powers each tube stage, as such dumble used very high quality metal film resistors. I am primarily using these old ones having stayed vacuum-sealed for almost half a century.
Some of the most fabled metal film resistors ever to exist, and that dumble used in some of the most appreciated amp’s are these mepco/electra mf7c, I also have some higher wattage military counterpart the mepco/electra rn70. What made these special was the earliest versions, distinct by their hexagonal end caps, not only excellent in measurable temperature coefficient but also highly precise. Adding to the allure are the fact they use silver as a mediator in their construction. I don’t have the exact values, but can make up 180k 150k 10k 15k and 35k, all usable values though I did end up opting for mostly the sealed CPM’s (above).
Next, I managed to add up a full set of sprague 6ps (the 6PS and 10PS is what you want nothing else, other ‘orange drop caps most often are not polyester but propolene film) , the exact capacitors used and some of the most appriciated ones in all of guitar amp history. A couple of which were of the very very earliest production over 50 years old and never used. As coupling capacitors, between tube stages, these directly and clearly effect the sound. Funnily enough these polyester film capacitors are avoided in hi-fi applications, as they bring on a distortion to the sound of the guitar. But, this added complexity in the sound has been appreciated by music lovers and musicians through the years, it brings a ‘thickening’ ‘grit’ and ‘heft’ to the sound some lower mids focus and distortion. Far from (an actual technical term) a ‘perfect capacitor’ they do however bring lots of joy to those performing or listening to music.
In this image I also show some very, very nice equally hard to find wima MKB capacitors I use these as tube stage bypass caps. I appreciate them for their fully shielded metal construction and polycarbonate make up, leading to high capacitance values for their small sizes. As they also are a much ‘better’, more true, capacitor they have a wider frequency response helpful in some applications. Using these instead of electrolytic capacitors (that dry up over time) also lowers the maintenance work of the amp.
Here some additional importent parts can be seen, new old stock Piher resistors, some from the 60’s none newer than the 70’s. You may wonder by now if there is a general reason for using old products, well guitar amp’s use vacuum tubes, a technology from the 50’s and earlier as such many parts used to make them work were also best made at the same time, as time passed, peak performing industries moved on to different goals and a need for many of the best parts ever made for this task ended. The Piher resistors used are carbon film composition and they actually also distort some when under high voltages, so when using them between tube stages, as grid stoppers, carrying a high voltage signal, they also color the sound, most would call it a ‘sweetening’ of the sound. In aggregate, when several are used, and their wattage rating is of a fitting value (1/2watt here) the difference is clear and nice, easily spotted using an AB-test.
Lastly as cathode resistors and grid leaks I use prp new production resistors, these do not carry signal through them but are precise and stable often used in Hi-fi applications.
And a quick mock-up to see how everything will fit, the board is a ‘turret circuit board’ this predates the pcb, printed circuit boards used today. Thing is, the board needs to be ‘staked’ with individual turrets in which to place and connect the components, a painstaking procedure which do leave the components very well of due to air circulation, good as these amp’s get quite ridiculously warm.
Fully assembled they end up like this, with a couple empty spots for additional possible modifications.
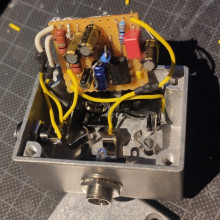
Here we can see some of the regulation and power supply parts providing power for supporting circuitry, such as relay power, switching settings. Some of the output tube sockets are visible to the left providing the main amplification together with the output transformer.
A better image on the main supply capacitors providing and storing and delivering DC electricity in specific voltages to different parts of the main circuit. Selecting the right ones are important due to their filtering job, cleaning the signal running the amp letting operate better. Also top left show the added supply capacitors for the effects loop I added.
The socket and circuitry in the middle of this picture supply the tube buffered effects loop missing in.the original transformer. This allow for a much better sound with ‘time based effects’ to the guitar sound, when adding delay, echo and reverberation to the sound.
On the bottom of this picture are the preamp tube-sockets and along the top the potentiometer controls for the amp. To the top right are relay boards with a couple added for mods allowing me to switch certain aspects of the amp as I play. Also there is the separate FET transistor input board providing a bit of a boost and buffer to one input jack. Top left show the hrm, added tone stack for the overdrive channel, otherwise missing on the exact model this amp is based on, provides a clearer sound when using high overdrive, think more ‘rock’ than jazz.
Finally at the end some pictures of the completed, functioning amp. Some unique bits include the raised green power lines to the preamp board, a trick used in, among others, Naim hi-fi amp’s, keeping the high voltage lines away from other parts of the circuitry.
Looking at the outside its clear to see I used edcor output transformer, clear influence on the sound, this one is mostly used in hi-fi gear, applying such designs in guitar amp’s got popularized with the soldano slo100 In the late 80’S, influemcing the tone in a way I PREFER (Also about twice the size of the original) . Otherwise I got a dumble wound transformer supplying the power from Italy with a custom metal end bell (did not like the original design although more expensive to make). A Hammond choke (used for filtering power) and some leftover tubes in this picture, the V1 (first, and most important tube) has a black short-plate sylvania tube from 1958 though so the tone in the first test did not suffer on that account (my best tubes where in one of my other amps at the time). From current production I would recommend JJ selected tubes in V3, fx loop, and sovtek lps (spiral heater) in V4, phase inverter. V1 and V2 should really have some very nice old stock tubes given their influence on the sound. Lastly I always prefer 6l6gc tubes in the power section as they have a more rounded bass.
Shocked if u read until here, but glad if you did, this write-up is just a quick reflection, as I present this amp on other parts of the Webb to people equally invested in the joyful experience of turning electronic components into music delivering machines. When it comes to electric guitar tone, the amplifier really becomes part of your instrument, to build it to your exact tastes is a blessing and wondrous exercise.